Android Forensics: APK Downgrades Part 2 Rooting and Unlocking a Google Pixel 6a
16 Feb 2025
12 minutes
Part 2: Rooting and Unlocking a Google Pixel 6a
Part 3: Creating Synthetic Test DataPart 2 of my Android Forensics: APK Downgrades series is here!

Prerequisites
This blog post discusses boot unlocking and rooting a Google Pixel 6a. To replicate this process, I recommend having, at the very least, your Google Pixel 6a device and a USB plug to connect to a computer. Software and tools such as Magisk, Android Factory Images, and SDK Platform are also useful to have prepared. Links to these applications will be included in this blog post.
Introduction
Getting root access on an Android device requires having an unlocked bootloader. Before we get into how to unlock and root our device, lets understand what these terms mean and why it’s important in a digital forensics investigation.
Boot Unlocking
According to official Android documentation, “A bootloader is a vendor-proprietary image responsible for bringing up the kernel on a device.” In other terms, it’s what’s loaded before the operating system and it also loads the operating system into memory itself. Once unlocked, not only do you have access to sensitive information, but you are also able to make changes that are typically restricted. For example, installing custom ROMs — “the internal flash memory that stores the operating system and firmware” — is typically what’s done to see fun features like themes and widgets you otherwise wouldn’t be able to select.
Why is this important to a DFIR examiner?
Boot unlocking has a number of purposes for a DFIR examiner. As an investigator, it’s critical to collect as much accurate and complete data as possible. A boot unlock allows you to gain access to raw and previously encrypted data, such as user data, system files, etc., which is crucial information for forensic analysis.
Something important to note is that if you’re conducting this on a device with pre-loaded or pre-existing data, this process would normally wipe the data. For project and testing purposes, I am following these steps on a “wiped” Google Pixel 6a bought off eBay. Later, I will be filling it with test data that I put together myself. HEXORDIA has a fantastic and free course on how to create mobile test data. Then, I will perform a full file system acquisition to further analyze how the device’s data is handled and stored.
Rooting
Rooting a device is a capability that comes with unlocking its bootloader. To put it simply, ‘rooting’ means to gain administrative rights on the file system of the device. With this, you’re able to install and delete any applications you want. Otherwise inaccessible data like user data, hidden files, or system logs become available; information that is essential in a forensics investigation.
Just like with anything else, there are risks to doing this. Rooting leaves your device open to security vulnerabilities. Under the wrong hands, superuser access can definitely be abused. Another potential issue is the possibility of bricking your device. With your device in a vulnerable state and depending on what’s installed, you can run into software issues like a corrupted firmware which would render your device unusable.
Disclaimer: Once again, this project is for learning purposes. If you choose to follow along, do so at your own risk and please take necessary precautions (getting a test device, doing backups, use a VM, etc.).
Walkthrough
This step by step walk through combines both unlocking the bootloader and the rooting of a Google Pixel 6a. I’d like to give credit to Hexordia for their great and in-depth tutorials for this process. You can find the links to those blog posts in the “References” section at the very end of this post 😄. My walkthrough is, for the most part, very similar but with updated information in necessary places (version numbers, available apps, etc.). Now, let’s get started!

Software and Tools you’ll need
In this tutorial, I will be using the following tools and software:
- Google USB Driver - https://developer.android.com/studio/run/win-usb
- Magisk - https://github.com/topjohnwu/Magisk
- Android factory Images - https://developers.google.com/android/images
- SDK Platform - Tools for Windows - https://developer.android.com/tools/releases/platform-tools
- Termux - https://play.google.com/store/search?q=termux&c=apps&hl=en_US
- Root Checker Pro (paid app; optional) - https://play.google.com/store/apps/details?id=com.joeykrim.rootcheck&hl=en_US&gl=US
Disclaimer: If you choose to use other tools or softwares, ensure that you are downloading them from a trusted/verified source.
Boot unlocking steps
Putting your device in developer mode
If your device is already in Developer mode, you probably don’t need the first couple steps so you can skip to the next section.
- Make sure your device is ready to go and plug it into a computer using a USB cable
- Open
Settings> Find and selectAbout Phone - Scroll down and look for the
Build numberof your device. Make note of the build number. - Click on
"Build number" 7 times. You should see a countdown till you are in Developer mode
Note: Device information like this, although it may seem irrelevant, is critical to have documented to maintain a solid chain of custody.
The build number of the Google Pixel 6a that I’m using is AP1A.240505.004.
- Navigate back to the main menu in settings > Click
System - From there, navigate to
{} Developer Options - Make sure
Use developer optionsis on as well asOEM unlocking - A warning pop up will appear. Select
Enableto proceed
Update the USB Driver
For this section we will be using the link for the
Google USB Driver. Once you navigate to the site you can download zip file by clicking on Download the Google USB Driver ZIP file (ZIP).
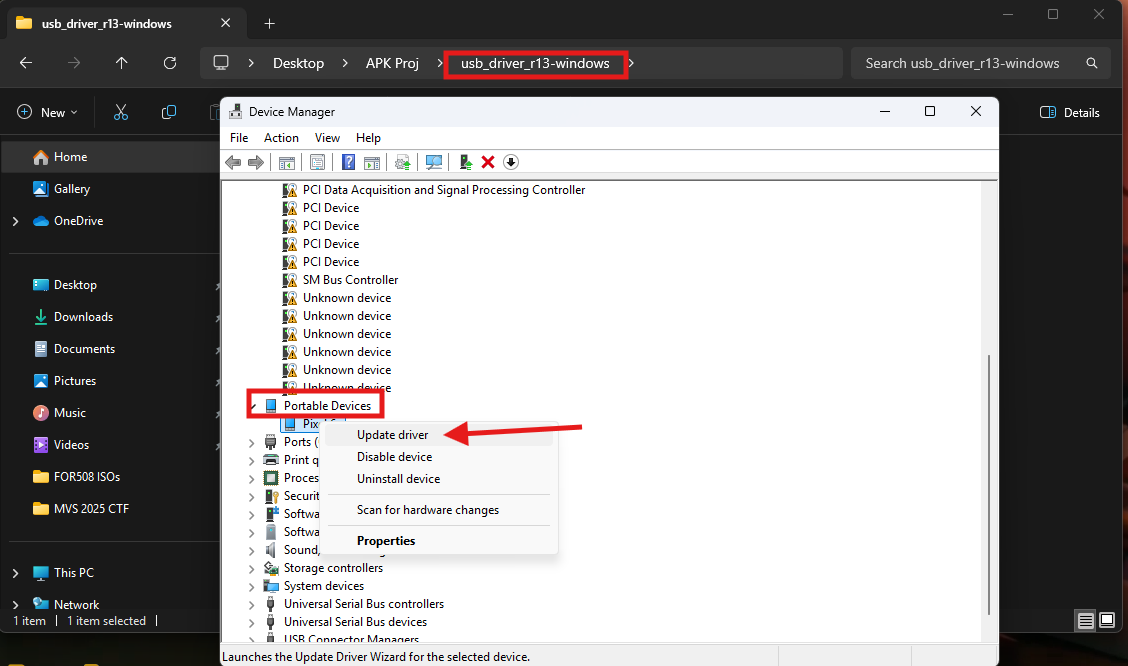
- Navigate to
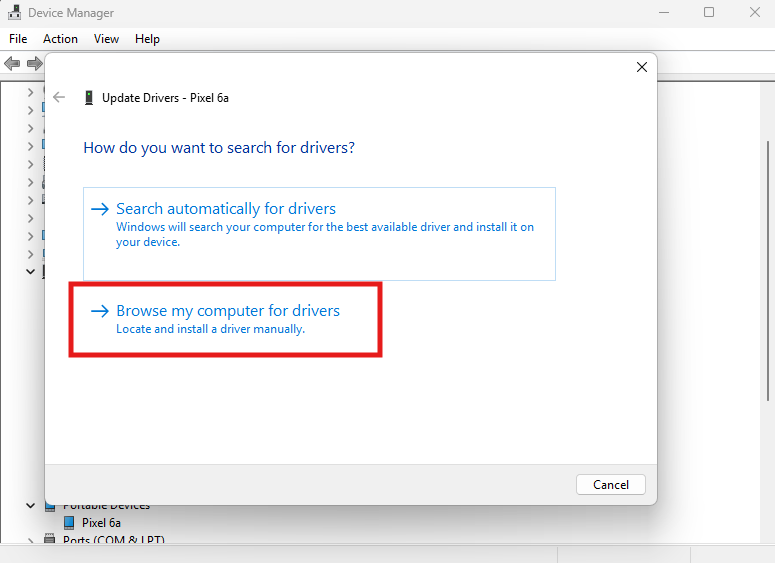
Device Manager>Portable Devices - Right click on your device (Google Pixel 6a) > Click on
Update Driver> ClickBrowse my computer for drivers
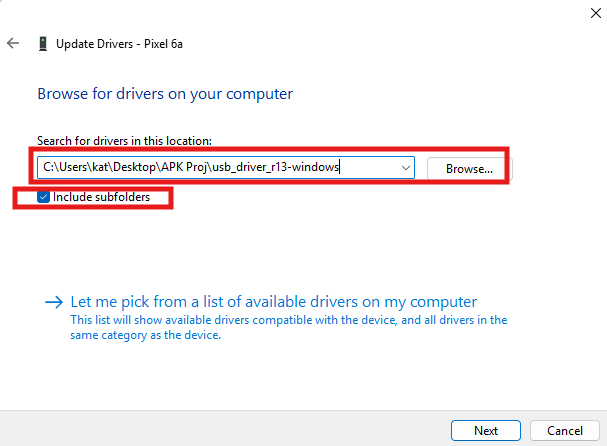
- Navigate to the folder where the downloaded ZIP file (
usb_driver_r13-windows.zip) is and select it > Make sure theInclude subfoldersoption is checked > ClickOK
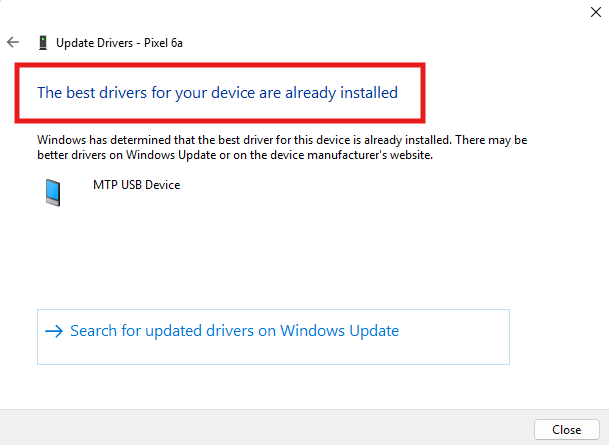
- You should then get either a
"Windows has successfully updated your drivers"or"The best drivers for your device are already installed"message. In my case, I got the latter
- Click
Close
Unlocking the Bootloader
From this point on, please note that any pre-existing data will wiped and lost. If you are doing this on a personal device that you intend to continue using as is, I would probably stop here.
We will also be using SDK Platform-Tools for Windows. If you haven’t already installed it, you can find it under the “Software and Tools you’ll need” section or you can click the following: Link to SDK Platform-Tools for windows.
- Restart the phone by holding on the
volume up and power buttonat the same time > ClickRestart - Once off, hold the volume buttons to get the device to start in
Fastboot mode - On your computer, in file explorer, open the
platform toolsfolder > Where the file path is, typeCMD - In
Command Prompt, type the following:
Code copied!
> fastboot flashing unlockIMPORTANT: At this point I realized that I missed something because after entering the command, I got the following message <waiting for devices>. After a quick google search, I found this:

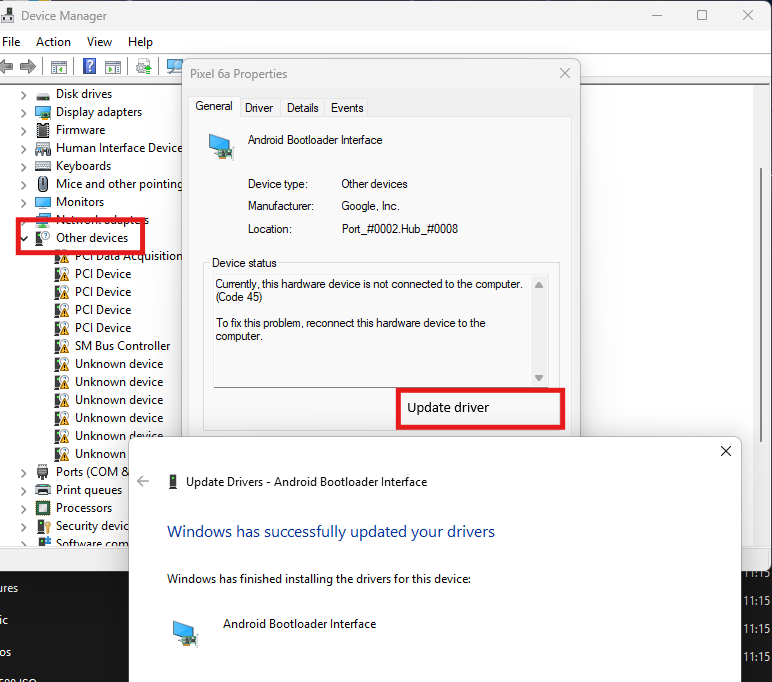
So, I went back into Device Manager and found that the device was now under Other Devices. Devices under here usually mean that they don’t have an identifiable driver. If this happens to you, continue from step 5. If you did not run into this issue, start at step 7.
- Double click on the Google pixel 6a > You should see an
Update Driverbutton
- From here, continue by following steps 2 (start at “Click
Browse my computer for drivers”) to step 5 under the “Update the USB Driver” section above - A warning message will pop up saying
"Do not unlock the bootloader" - Press the volume key >
"Unlock the Bootloader >"will pop up > Click on the>button (the power button) - You should see
"Device State: Unlocked"and a"Start >"button > Click"Start >" - The device will now restart and now…
Bootloader unlocking is now complete! Next is rooting the device…
Rooting the device
Prepare the device
- If your device is not already, plug it into a computer using a USB cable
- Open
Settings> Find and selectAbout Phone - Scroll down and look for the
Build numberof your device. Make note of the build number - Click on
"Build number" 7 times. You should see a countdown till you are in Developer mode
Note: Unlocking the bootloader wiped the device thus, we have to repeat the steps to get into developer mode.
- Navigate back to the main menu in settings > Click
System - From there, navigate to
{} Developer Options - Turn on
Stay awake> Turn offAutomatic system updates> Turn onUSB debugging - Navigate back to the main menu in settings and now we’ll change USB preferences
- Click on
Connected devices> Click onUSB> Under “Use USB for” choose theFile transfer / Android Autooption
Using platform-tools
If you don’t already have platform tools installed, you can download it here:
- On your computer, in file explorer, open the
platform toolsfolder > Where the file path is, typeCMD - In
Command Prompt, type and run the following command:
Code copied!
> adb devicesNote: The output on the command prompt might say “unauthorized”. If this is the case, continue to the next step. Otherwise, skip to step 5.

-
On your device, you should see a pop-up that says
"Allow USB debugging?"> Check the box that says"Always allow from this computer"> ClickAllow -
Rerun the
adb devicescommand again and you should no longer see"unauthorized"
-
In command prompt, run the following command:
Code copied!
> adb reboot bootloader- On your device, look for the
"Bootloader version"name. Make note of the bootloader version name. In my case, its “bluejay-1.3-11403664”
Using Factory Images
For this part we will be using Android Factory Images. You can find the link under the “Software and Tools you’ll need” section or you can click the following: Link to Android Factory Images.
-
On the website, click on
"Factory Images for Nexus and Pixel Devices"on the top left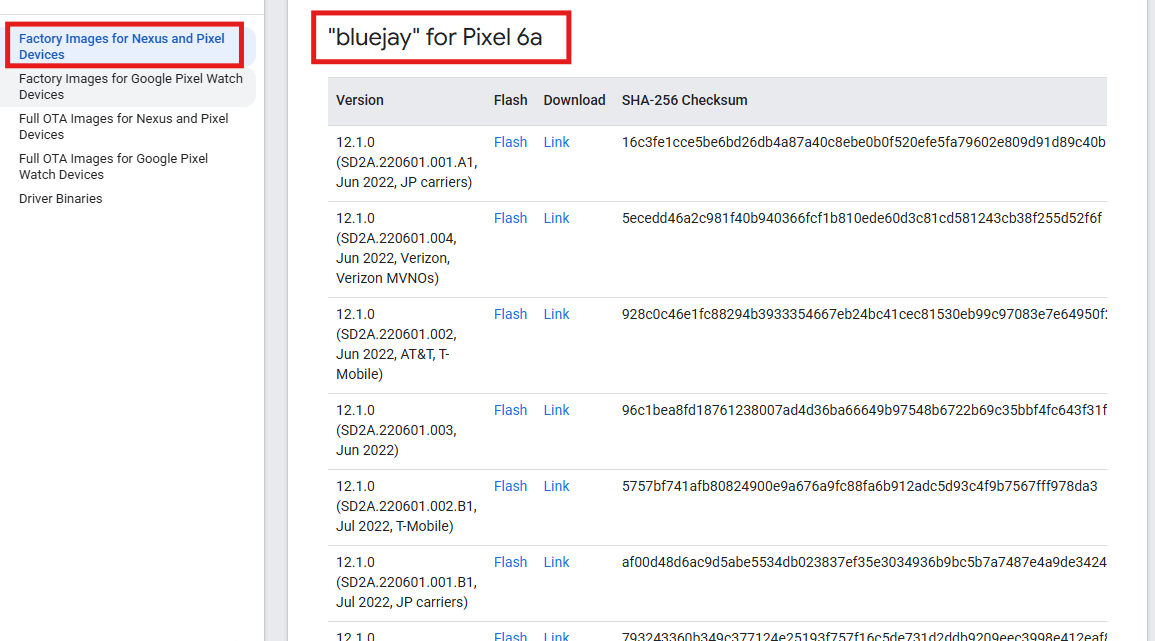
-
Search for the
Bootloader version name (ex: Ctrl+F + "bluejay")> Search for theBuild number of the device (ex: Ctrl+F + AP1A.240505.004)> ClickLinkto download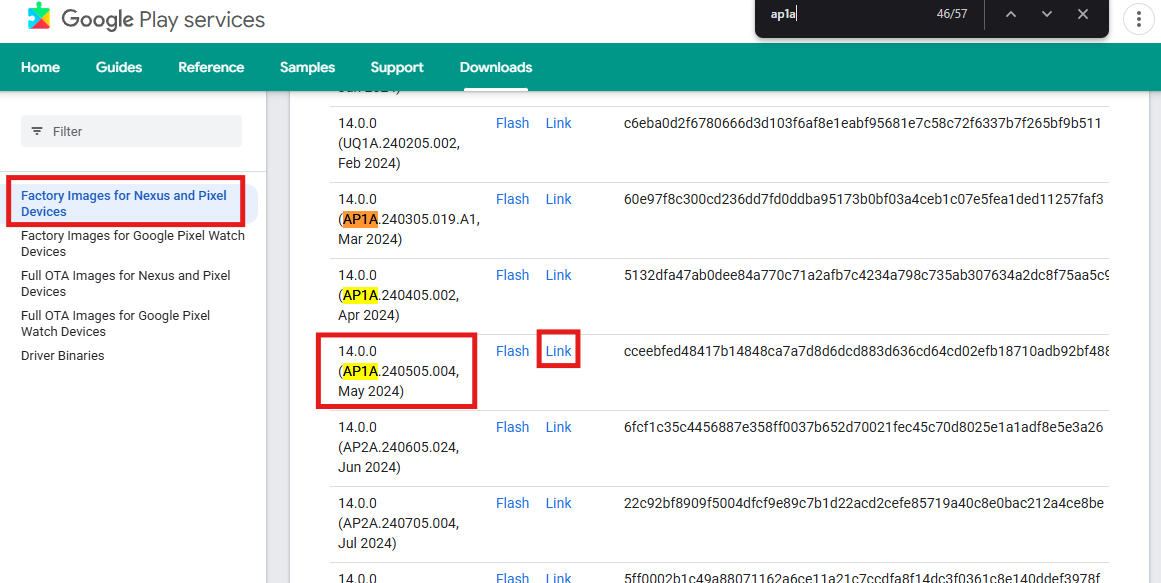
-
Once you extract the files in the ZIP file, click into it and you should find another ZIP file starting with
"image-">Extract the filesfrom that second ZIP -
Go into that
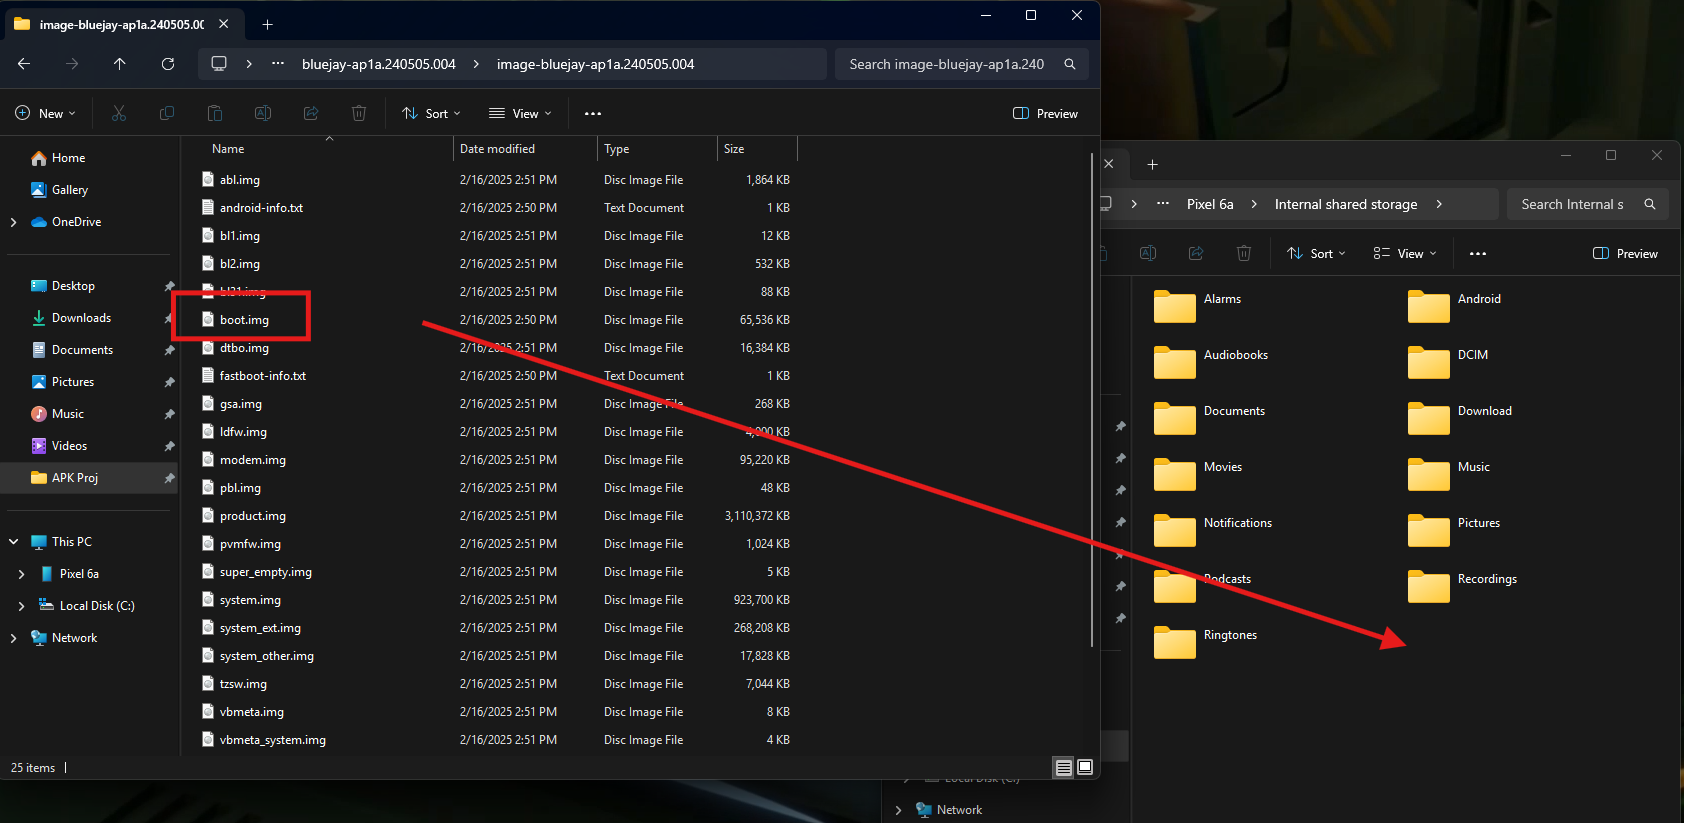
"image-"folder > Find theboot.imgfile -
On your device, make sure the device is in the
"File transfer / Android Auto"mode again. If you forgot how, please refer to steps 8 and 9 under the “Preparing the device” section from earlier -
If done properly, you should see your Google Pixel 6a device under
> This PCin the File Explorer -
In another File Explorer window, navigate to devices
Internal Shared Storage -
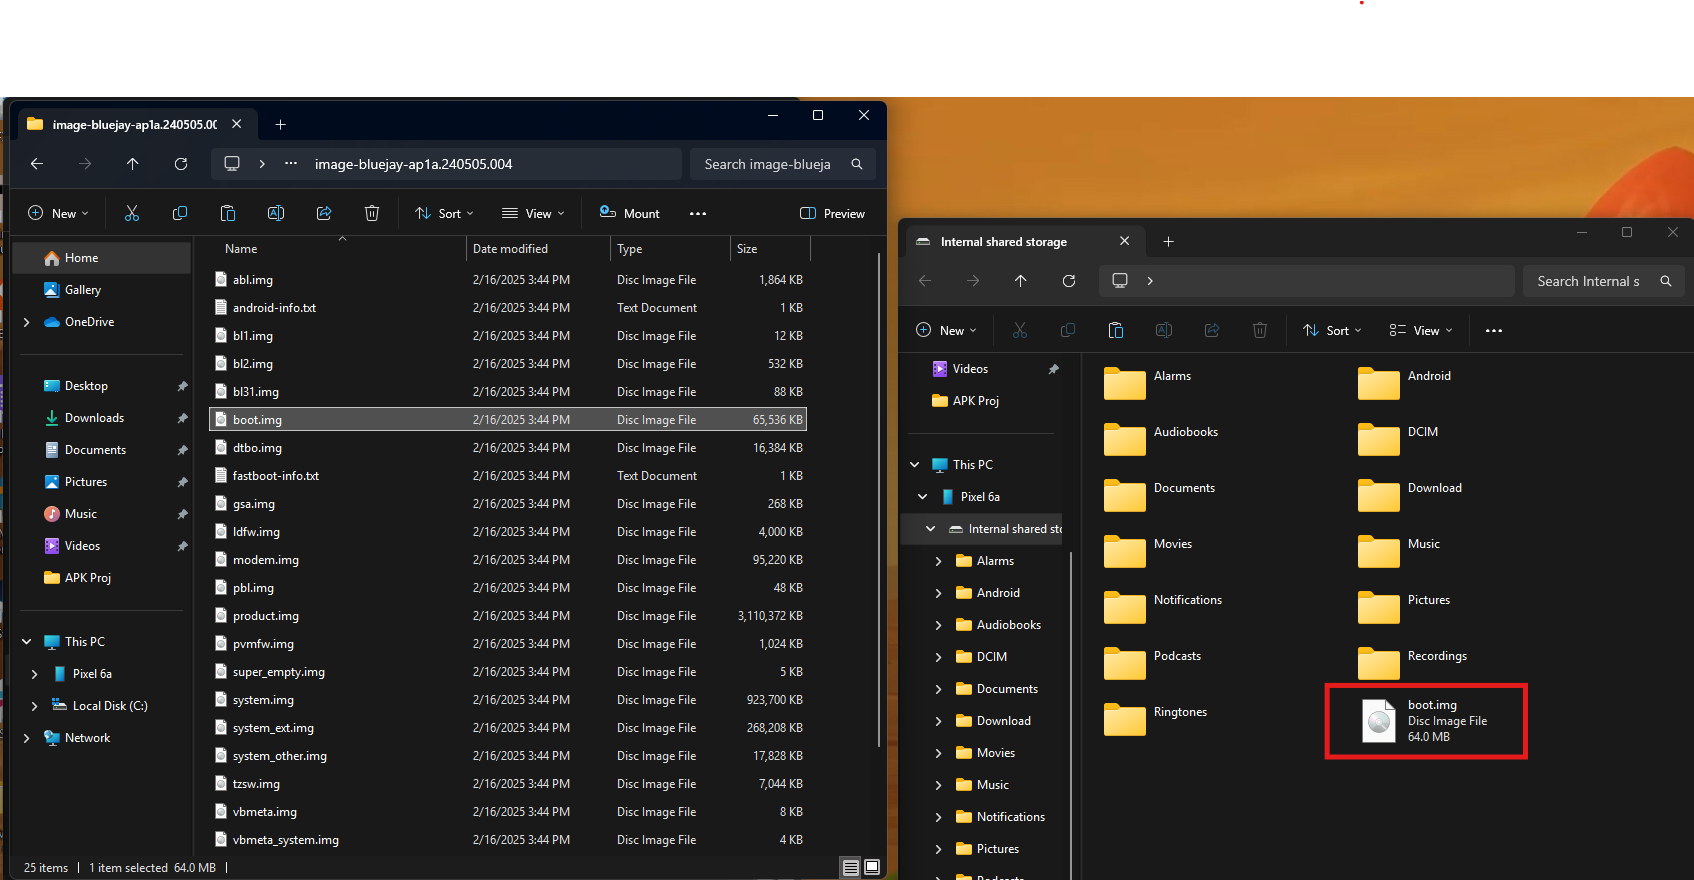
Drag the
boot.imgfile to an empty spot (drag it to any blank area). DO NOT place the file into a folder. It should be in the root of the storage
Note: When I tried dragging the image to root storage, it wasn’t copying over for some reason. To fix this, I simply unplugged then plugged in my device again and it worked.
Using Magisk
On your device, navigate to the Magisk link. You can find the link under the “Software and Tools you’ll need” section or you can click the following: Link to Magisk.
- Scroll to the bottom of the page > Find
Releases> Click onLatest. As of this post, the latest version is Magisk v28.1 - Scroll down to Assets > Click on
Magisk-v28.1.apk - If you get a
"File may be harmful"pop-up, click"Download anyway" - In your browser, navigate to
Downloads> Click on the downloaded file - You will get a pop-up to about the device not allowing the download of unknown apps > Click
Settings> ClickAllow from this source - A Magisk pop-up will appear saying either
"Do you want to install this app?"or"Do you want to update this app?"> ClickInstallorUpdate Openthe Magisk app > ClickInstallnext to Magisk > ChooseSelect and Patch a File- Select the
three horizontal linesat the top left next to the “Search this phone” bar > SelectPixel 6a> Choose theboot.imgfile that we copied to the device > Click"LET'S GO"in the top right corner - Once it’s done installing, you should see an
"All done!"message - Navigate back to
Settingsand make sure the device is still inFile transfer / Android Automode - In
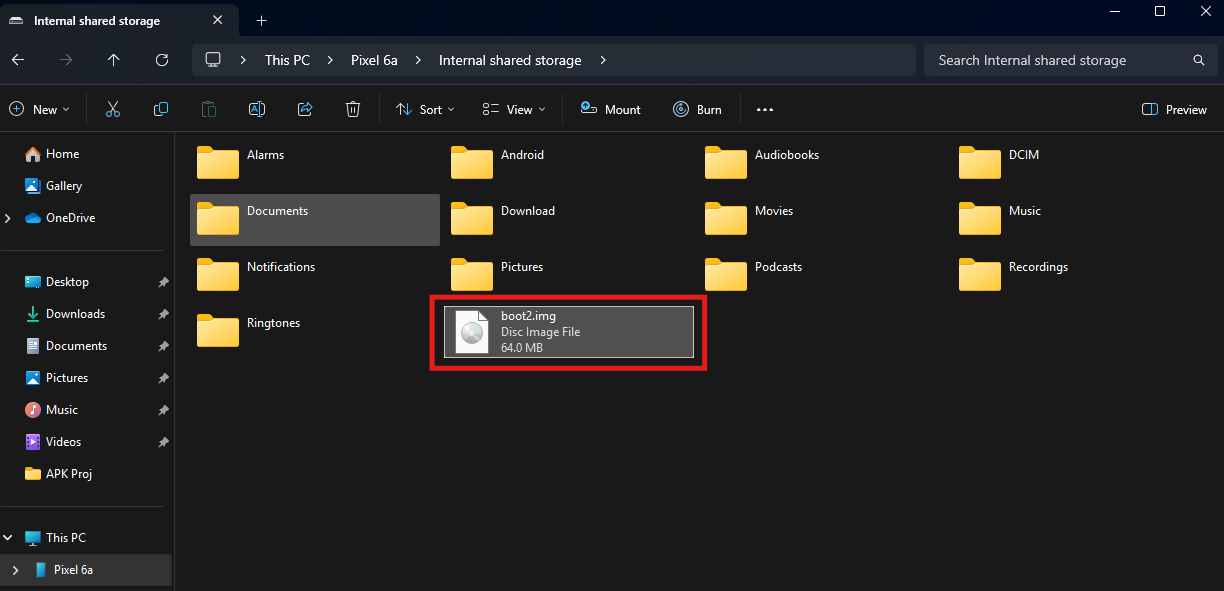
File Explorer, navigate back to where we copiedboot.imgon the device >Renamethe file toboot2.img
- Open the
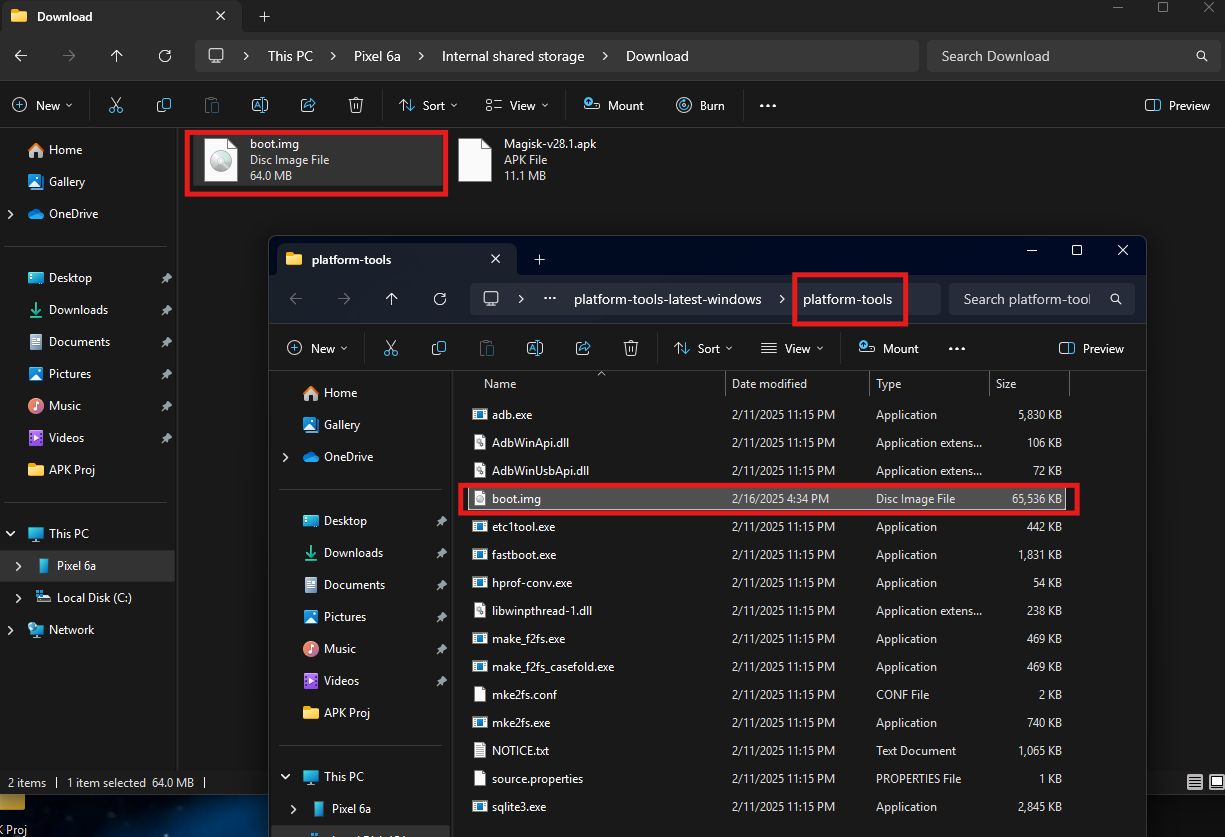
Downloadfolder > Find the file named"magisk_patched-.img"(in my case its “magisk_patched-28100_j6KVh.img”) > Rename the file to"boot.img"

Copythe image to theplatform-toolsfolder
- In the
platform toolsfolder > Where the file path is, typeCMD - In
Command Prompt, type and run the following commands one by one:
Code copied!
// Make sure the computer and the device are connected
> adb devices

// Put the device into fastboot mode
> adb reboot bootloader

// Run this while in fastboot mode
> fastboot flash boot boot.img

// Once complete, reboot
> fastboot reboot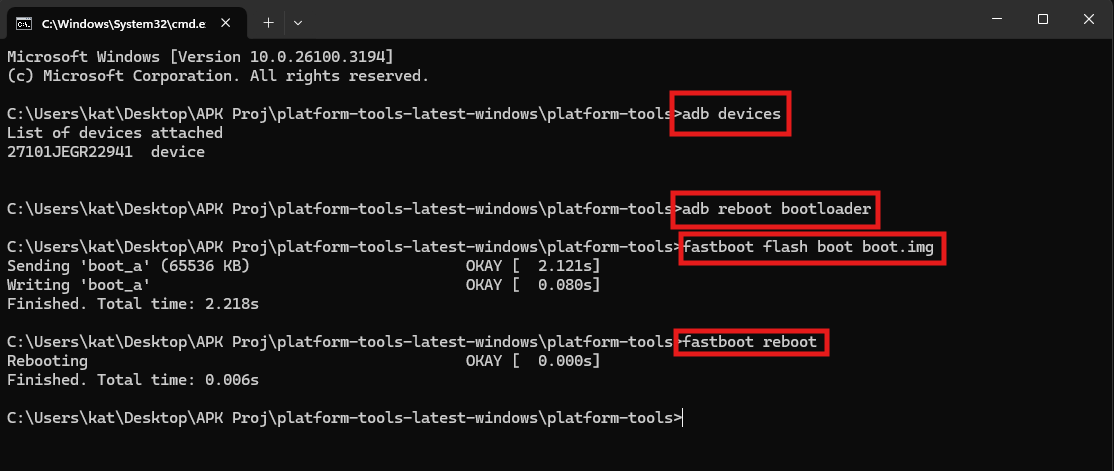
- The device should now restart
Verify root
Unfortunately, at the time of this post, the Root Checker App (recommended in Hexordia’s blog post) in the Google Play store is no longer free. However, as we know, with root access comes superuser access, SO, I downloaded Termux, a terminal emulator app, by Fredrik Fornwall.
- In the Google Play Store, search for
Termux> ClickInstall - Open the
Termuxapp > Type the commandsufor superuser > HitEnter - A pop-up for Superuser Request will appear > Click
Grant. This will grant superuser access forever - And now…
You’re done!
Conclusion
You have officially unlocked and rooted your Google pixel 6a! Don’t worry if you run into any issues along the way - this can be a very long an tedious process for anyone new to doing this (like me 😅 ). In my next blog post, I will be discussing the process of taking a full file system acquisition as well as generating test data to load into the phone. As always, feel free to contact me if you run into any issues, find that I have inaccurate information, or have any advice/tips. Until next time!

References
- https://source.android.com/docs/core/architecture/bootloader
- https://www.hexordia.com/blog/unlock-rooting-pixel6a?rq=google%20pixel
- https://www.hexordia.com/blog/unlock-rooting-pixel6a?rq=google%20pixel
- https://wccftech.com/how-to/how-to-root-pixel-6-and-pixel-6-pro-with-magisk/
- https://wccftech.com/how-to/how-to-unlock-pixel-6-and-pixel-6-pro-bootloader/
- https://www.naldotech.com/google-pixel-6-unlock-bootloader/
- https://www.getdroidtips.com/unlock-bootloader-root-google-pixel-6-6-pro/
- https://cellebrite.com/en/glossary/boot-loader-mobile-device-forensics/